Bike brakes not releasing are usually caused by high friction in dirty or rusted cables, low spring tension, or worn pads catching on the rim. These problems affect V-brakes, sidepull calipers, and hydraulic disc brakes on mountain, road, gravel, and cyclocross bikes.
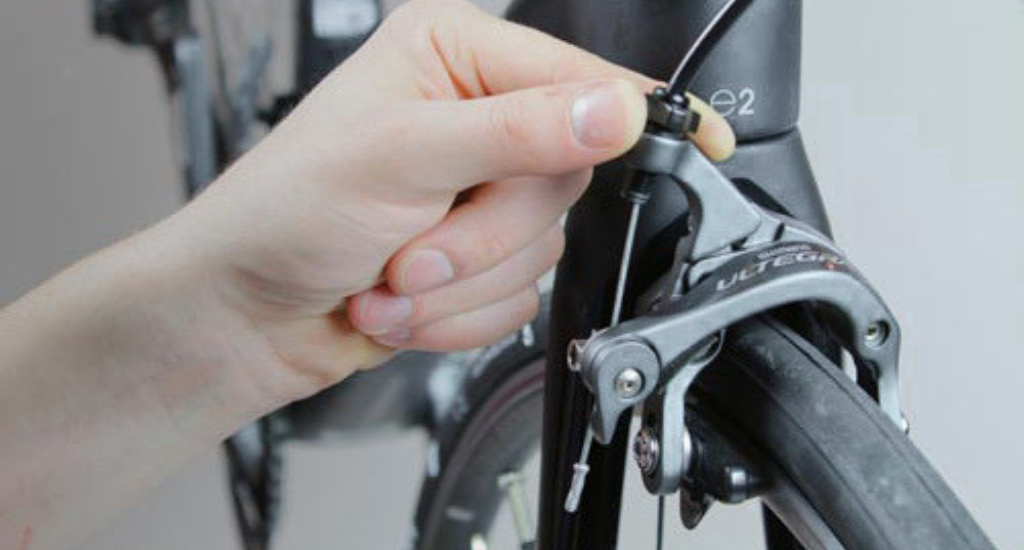
The fastest way to diagnose this issue is to disconnect the brake cable from the caliper. If the brakes release freely, the cable is the problem. If the brakes stay stuck, check the caliper, springs, or pads.
This BicycleXpert guide covers the 7 most common causes, step-by-step fixes for each brake type (including Shimano and SRAM hydraulic systems), and how to release the brakes to remove your wheel.
Quick Troubleshooting: How to Find the Problem
Disconnect the brake cable from the caliper anchor point first. This single test isolates whether the problem is cable-related or in the brake mechanism itself.
Squeeze the brake arms together by hand, then release. If the brakes snap back freely, the cable or housing is causing the issue. Sticky, rusted, or dirty cables prevent smooth return movement.
If the brakes stay stuck with the cable disconnected, the problem is in the caliper, springs, or pads. Check for seized pivot points, weak return springs, or worn pads catching on the rim.
Look for visible rust on cables or housing. Check if pads have a lip that hooks under the rim edge. Verify the brake is centered on the wheel.
7 Common Causes of Bike Brakes Not Releasing
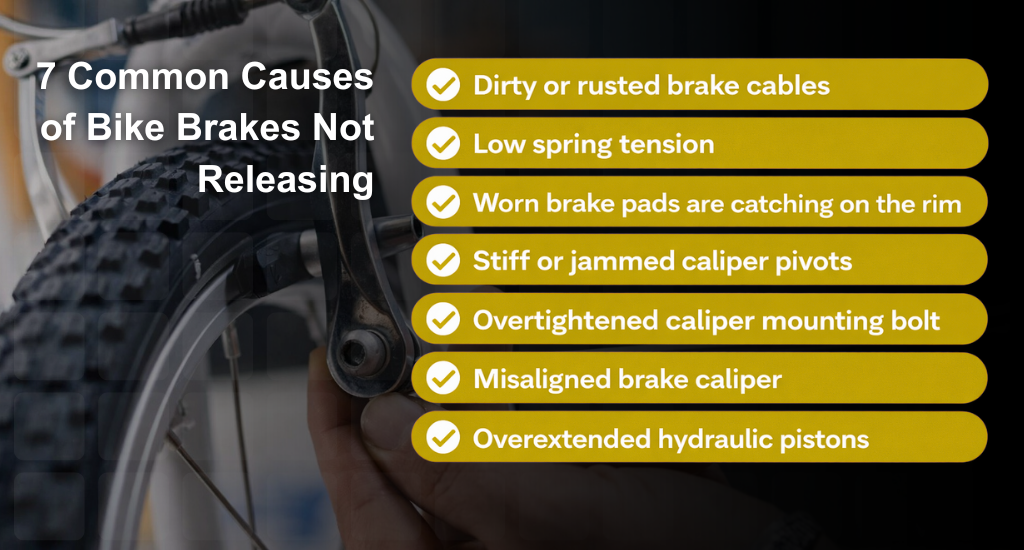
Bike brakes not releasing fall into seven common causes. Each requires a different fix depending on your brake type and the severity of the problem.
The causes below are ordered by how frequently they occur. Most stuck brakes result from cable or spring issues. Hydraulic brake problems are less common but require specific techniques to resolve.
The 7 causes:
- Dirty or rusted brake cables
- Low spring tension
- Worn brake pads are catching on the rim
- Stiff or jammed caliper pivots
- Overtightened caliper mounting bolt
- Misaligned brake caliper
- Overextended hydraulic pistons
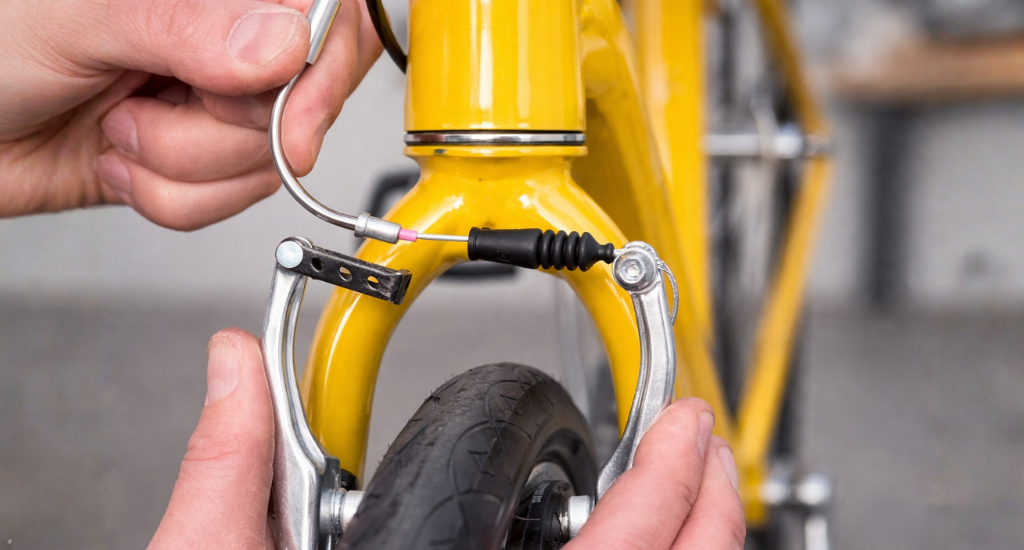
1. Dirty or Rusted Brake Cables (80-100 words)
Dirty or rusted brake cables create high friction, preventing smooth cable movement. The cable cannot return after the lever is released, keeping the brakes engaged against the rim or rotor.
Common symptoms include stiff lever feel, brakes that engage but won’t release, and visible corrosion or fraying at cable ends. Bikes stored outdoors or in damp conditions develop this problem frequently.
Disconnect the cable and slide it through the housing to test. If movement feels stiff, the cable needs attention. Lubricate with bike-specific cable lube for minor issues. Replace both the cable and the housing if they are heavily rusted or frayed. Check for sharp bends or crushed housing sections that restrict movement.
2. Low Spring Tension (80-100 words)
Low spring tension prevents brake arms from pulling away from the rim or rotor after braking. Return springs weaken over time or lose tension from improper adjustment.
Symptoms include brakes that release slowly or incompletely, pads dragging on the rim, and uneven release where one side sticks. V-brakes and caliper brakes both use spring tension to return arms to the resting position.
Locate the tension adjustment screw on the brake arm. Turn clockwise to increase tension on the weak side. For V-brakes with very weak springs, unhook the spring from the frame peg and bend it slightly outward to increase force. Balance both sides so the brakes release evenly.
3. Worn Brake Pads Catching on Rim
Worn brake pads develop a lip on the rubber edge that hooks under the rim, preventing release. Pads positioned too low can also catch on the tire during braking.
Symptoms include brakes that engage normally but don’t release cleanly, scraping sounds, and a visible hook or lip on the pad edge. This happens gradually as pads wear unevenly against the rim surface.
Inspect pad surfaces for uneven wear or lip formation. File down the lip with a flat file or sandpaper if the pad still has sufficient material. Replace pads worn below 1mm in thickness. Reposition pads so they contact the rim squarely without angling downward.
4. Stiff or Jammed Caliper Pivots
Stiff or jammed caliper pivots prevent brake arms from springing back freely. Pivot points can seize due to corrosion, dirt buildup, or lack of lubrication over time.
Symptoms include brake arms that don’t move freely when pushed by hand, a grinding feel during movement, and one arm moving more than the other. This affects both rim brake calipers and V-brake pivot bolts.
Spray penetrating oil or thin lube into the pivot points. Work brake arms back and forth to distribute lubricant throughout the mechanism. Clean the pivot area of dirt and debris with a rag. For severe corrosion, disassemble the caliper completely, clean all parts, and re-grease pivots before reassembly.
5. Overtightened Caliper Mounting Bolt
Overtightened caliper mounting bolts prevent the brake from rotating freely to center itself. This common problem occurs on sidepull calipers after new brake installations or adjustments.
Symptoms include a caliper that feels locked in place, brakes that don’t self-center after engagement, and a pad that constantly drags against the rim.
Loosen the mounting bolt by a quarter turn. The bolt should be tight enough to hold position but loose enough for the caliper to pivot. Squeeze the brake lever and release to check if the caliper centers itself. Adjust and re-tighten incrementally until movement feels smooth.
6. Misaligned Brake Caliper
Misaligned brake calipers cause uneven pad contact that prevents proper release. One pad sits closer to the rim or rotor than the other, creating constant rubbing on one side.
Symptoms include brakes rubbing on one side only, wheels that don’t spin freely, and uneven pad wear. This affects both rim brakes and disc brakes.
For rim brakes: Loosen the caliper mounting bolt. Squeeze the brake lever to the center pads on the rim. Hold the lever and tighten the bolt.
For disc brakes: Loosen both caliper mounting bolts. Squeeze the lever firmly, then tighten the bolts while holding. Spin the wheel to verify no rubbing.
7. Overextended Hydraulic Pistons
Overextended hydraulic pistons push brake pads together too tightly, clamping the rotor constantly. This happens when the brake lever is squeezed with the wheel removed. Common to Shimano and SRAM hydraulic disc brake systems.
Symptoms include pads touching the rotor constantly, wheels that won’t fit back into the frame, and a lever that feels spongy then suddenly engages.
Never squeeze hydraulic brake levers with the wheel removed.
Remove the wheel and brake pads from the caliper. Use a plastic tire lever or Park Tool piston press to push pistons back into the caliper body. Push evenly on both sides to avoid damaging seals. Clean exposed piston surfaces with isopropyl alcohol. Reinstall pads and wheel.
How to Fix V-Brakes That Won’t Release

V-brakes not releasing typically result from weak springs, uneven tension, sticky noodles, or binding cables. These linear-pull brakes use spring tension at each arm to pull pads away from the rim.
Weak springs: Unhook the spring from the frame peg and bend it slightly outward to increase tension. Rehook and test release.
Uneven release: Locate the small tension screw on the side of each brake arm. Turn clockwise to increase the pull-back force on that arm. Turn counterclockwise to decrease. Adjust until both arms release evenly.
Sticky noodle: Clean or replace the metal noodle guide where the cable enters the brake arm. Dirt buildup here restricts cable movement.
Cable binding: Lubricate or replace the cable and housing if the lever feels stiff or doesn’t return smoothly.
Pads should sit 1-2mm from the rim when properly adjusted. For complete brake adjustment steps, see our guide on adjusting mountain bike brakes for safe and smooth rides.
How to Fix Rim Brake Calipers That Won’t Release
Rim brake calipers not releasing usually stem from overtightened mounting bolts, seized pivots, excessive cable tension, or bent caliper arms. Sidepull and centerpull calipers both use similar fixing methods.
- Overtightened mounting bolt: Loosen slightly until the caliper can pivot freely while still holding position.
- Seized pivot: Lubricate pivot points with penetrating oil. Work arms back and forth to distribute lubricant throughout the mechanism.
- Cable tension too high: Turn the barrel adjuster clockwise to release tension. Pads should sit 1-2mm from the rim at rest.
- Bent caliper arm: Straighten carefully with adjustable pliers or replace the caliper if damage is severe.
- Centering procedure: Loosen the mounting bolt until the caliper moves side to side. Squeeze the brake lever to the center pads on the rim. Hold the lever and tighten the mounting bolt. Fine-tune with the centering screw if available.
How to Fix Hydraulic Disc Brakes That Won’t Release

Hydraulic disc brakes not releasing usually result from pistons pushed together, contaminated pistons, air in the system, or caliper misalignment. Shimano brakes use mineral oil while SRAM brakes use DOT fluid. Each requires different bleeding procedures.
Pistons pushed together: Remove wheel and pads. Use a plastic tire lever or Park Tool piston press to push pistons back into the caliper body evenly.
Contaminated pistons: Clean exposed piston surfaces with isopropyl alcohol. Dirt buildup prevents smooth piston retraction.
Air in system: Spongy lever feel indicates air bubbles. Bleeding the brakes removes air but requires specific tools and fluid for your brake brand.
Caliper misalignment: Loosen both mounting bolts. Squeeze the lever firmly and tighten the bolts while holding. Spin the wheel to check for rubbing.
Reinstall pads and wheel after piston reset. Pump the lever a few times to restore the pad position against the rotor.
For detailed caliper alignment steps, see our guide on how to adjust disc brakes on a mountain bike.
How to Release Bike Brakes to Remove a Wheel
Releasing the bike brakes to remove a wheel requires different steps depending on your brake type. Each system has a quick-release mechanism designed for easy wheel removal.
For V-brakes: Squeeze both brake arms together with one hand. Unhook the metal noodle from the holder with the other hand. Arms spring apart, and the wheel slides out freely.
For caliper brakes: Flip the quick-release lever on the caliper body if equipped. Alternatively, loosen cable tension using the barrel adjuster. Slide the wheel out once the pads clear the rim.
For disc brakes: No brake release needed. The disc rotor slides between the pads during wheel removal. If the pads are touching, gently push them apart with a plastic tool. Insert a pad spacer after removing the wheel to prevent pistons from closing together.
If pads are contaminated or squealing after wheel reinstallation, see our guide on how to sand disc brake rotors on a bike.
How to Release Bike Brakes to Remove a Wheel
Releasing the bike brakes to remove a wheel requires different steps depending on your brake type. Each system has a quick-release mechanism designed for easy wheel removal.
For V-brakes: Squeeze both brake arms together with one hand. Unhook the metal noodle from the holder with the other hand. Arms spring apart, and the wheel slides out freely.
For caliper brakes: Flip the quick-release lever on the caliper body if equipped. Alternatively, loosen cable tension using the barrel adjuster. Slide the wheel out once the pads clear the rim.
For disc brakes: No brake release needed. The disc rotor slides between the pads during wheel removal. If the pads are touching, gently push them apart with a plastic tool. Insert a pad spacer after removing the wheel to prevent pistons from closing together.
What If Brakes Only Stick on One Side?
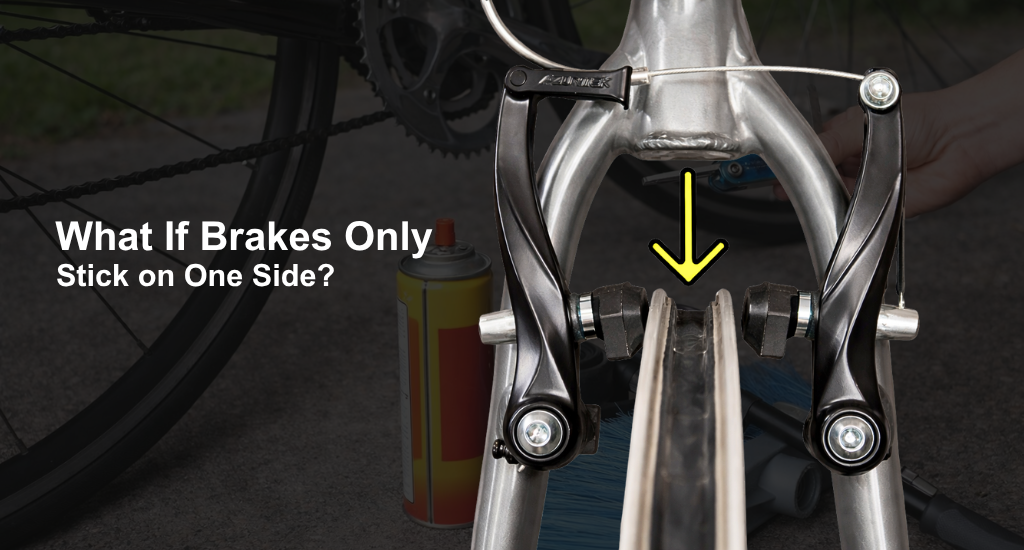
Brakes sticking on one side indicate uneven spring tension, a seized pivot on one arm, or a caliper that isn’t centered over the rim or rotor.
Uneven spring tension: One brake arm has a weaker spring force than the other. Adjust the tension screw on the sticking side. Turn clockwise to increase the pull-back force on that arm.
One pivot seized: Only one arm moves freely while the other feels stiff. Lubricate both pivots with penetrating oil and compare movement. Clean or disassemble the seized pivot if lubrication doesn’t help.
Caliper not centered: One pad sits closer to the braking surface than the other. Re-center the caliper using the mounting bolt method for rim brakes or the two-bolt alignment method for disc brakes.
When Should You Take Your Bike to a Shop?
Take your bike to a shop when DIY fixes don’t resolve the problem or when repairs require specialized tools and expertise. Brakes are safety-critical components.
Visit a professional if:
- The hydraulic brake lever pulls to the handlebar with no resistance, indicating a fluid leak or air in the system
- Pistons won’t retract after cleaning and resetting
- The brake cable housing is cracked inside the frame with internal routing
- The caliper body is cracked or visibly damaged
- Repeated failures occur after multiple attempted fixes
- You feel uncomfortable working on brakes
Basic brake service costs $20- $50 at most shops. This investment is worthwhile when safety is at stake.
Conclusion
Bike brakes not releasing are usually caused by dirty cables, low spring tension, or worn pads catching on the rim. Start by disconnecting the cable to isolate whether the problem is cable-related or in the brake mechanism itself.
Most fixes take under 30 minutes with basic tools. Check pivot points, adjust spring tension, and ensure calipers are properly centered. For Shimano or SRAM hydraulic systems that need bleeding, visit a professional.
Brakes are your most important safety system. When in doubt, replace worn components or seek expert help.
Follow BicycleXpert for more expert bike maintenance guides.
FAQs
How Do I Fix My Bike Brakes Not Releasing?
What Causes Bike Brakes to Lock Up?
Can I Use WD-40 on Stuck Bike Brakes?
Can I Use Rubbing Alcohol to Clean Brake Rotors?
Why Are My Disc Brakes Stuck Closed?