A bent rotor on a mountain bike can cause noise and uneven braking during every ride. This thin metal disc can lose shape after a crash, heat from long descents, or poor transport care.
You may hear a light rubbing sound or feel a pulse when you press the brake lever. Braking power can also drop, which makes control harder on rough or steep trails.
This guide explains how to fix a bent rotor on a mountain bike with simple steps and tools.
How to Fix a Bent Rotor on a Mountain Bike (Step-by-Step Guide)
A bent rotor can look serious, yet most small bends are easy to correct at home. You need patience and light hand pressure. This section explains how to fix a bent rotor on a mountain bike in clear steps.
Tools You’ll Need Before You Start
You do not need many tools for this task, yet the right items make the work easier and safer.
- Rotor truing fork tool: This tool fits the rotor shape and helps you bend it back with better control.
- Adjustable wrench: It works as a backup if a truing tool is not available at home.
- Bike stand (optional): A stand keeps the bike stable and lets the wheel spin freely during checks.
- Clean cloth or gloves: These protect the rotor from dirt and oil that can reduce braking performance.
Step 1: Identify the Bent Section
You should start by lifting the wheel off the ground so it spins without touching anything. Spin the wheel slowly and watch the rotor pass through the brake caliper.
Look closely for a side movement, which shows the bent section clearly. Use the brake pad or frame edge as a guide to spot this small shift.
Step 2: Mark the Bend Location
Once you find the problem area, mark it so you can return to the same spot easily. You can use a marker or remember the position near the valve stem.
You should focus on the exact center of the bend, since this point needs correction. Accuracy here helps you avoid extra work later.
Step 3: Use a Rotor Truing Tool Correctly
Place the rotor truing tool on the marked section, right at the center of the bend. You should hold the tool steady and apply light pressure in the opposite direction.
Do not push hard at once, because a strong force can damage the rotor shape further. Always apply a small amount of pressure and check the result after each move.
You should make tiny corrections step by step instead of one strong push. This slow method gives better control and reduces the risk of over-bending.
Step 4: Recheck and Repeat
Spin the wheel again after each small adjustment to see the current rotor position. You should look for any remaining wobbles and note the next correction point.
Repeat the same process with small pressure until the rotor moves straight through the caliper. Many small adjustments work better than one large bend attempt.
Step 5: Test the Brakes
After the rotor looks straight, test the brakes before heading out on a long ride. Spin the wheel and listen for any rubbing sound near the brake pads.
You should take a short ride and press the brakes a few times to feel the response. The braking should feel smooth and steady without vibration or noise.
When You Should NOT Fix a Rotor (Replace Instead)
Some rotors cannot be fixed safely, even if the bend looks small at first glance. In these cases, replacement is the better choice to protect your safety and braking control.
Minimum Thickness Limit (Critical Safety Factor)
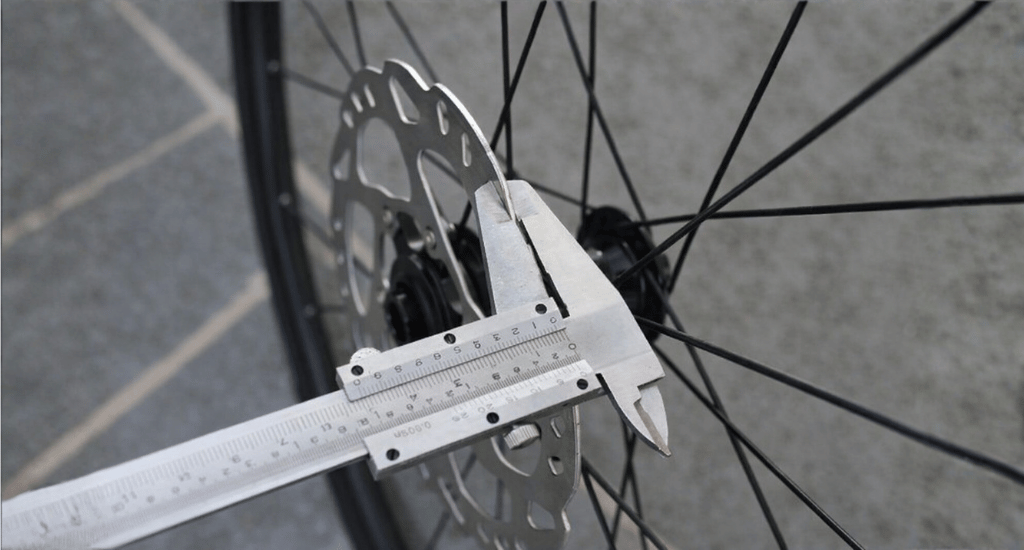
Every rotor has a minimum safe thickness, which is usually around 1.6 mm for most mountain bikes. If the rotor reaches 1.6 mm or less, you should replace it without delay.
A thin rotor cannot handle bending pressure and may fail during braking. It can lead to serious control issues on trails or steep descents.
Signs the Rotor Is Too Damaged
Some damage goes beyond simple repair and needs a full replacement instead. You should look for clear signs that show the rotor is no longer safe to fix.
- Large bends that are easy to see without close inspection
- Cracks on the rotor surface or near the edges
- Blue or dark spots caused by heat damage
- Failed results after several correction attempts
These signs show the metal has lost strength and cannot return to its original shape.
Cost vs Safety Decision
A new rotor does not cost much compared to the risk of brake failure during a ride. It is always better to choose safety over saving a small amount of money.
If the rotor looks badly damaged, replacement gives you better performance and peace of mind.
Common Causes of Bent MTB Rotors
A rotor does not bend without a reason, and most causes come from daily riding or simple mistakes. When you know these causes, you can protect your bike and avoid frequent brake issues.
Trail Impacts and Crashes
Rough trails often have rocks, roots, and sudden drops that can hit the rotor directly. A small crash or a side fall can push the rotor out of shape and create a visible wobble.
Heat Warping from Braking
Long downhill rides put constant pressure on the brakes and build strong heat in the rotor. This heat can change the metal shape slightly, which results in a warped or uneven rotor surface.
Improper Transport or Storage
Placing the bike on its side or against hard surfaces can press the rotor and bend it slowly. Tight bike racks can also apply uneven pressure and cause small shape changes over time.
Accidental Pressure During Maintenance
During cleaning or repair, tools or hands can press against the rotor without notice. Even a light force at the wrong angle can shift the rotor and create alignment issues later.
Wheel Installation Mistakes
Incorrect wheel placement or loose axle tightening can push the rotor out of line. This misalignment can look like a bend and may turn into a real issue after a few rides.
Tips to Prevent Rotor Bending
A few simple habits can protect your rotor and keep your brakes smooth for a long time. These small steps can reduce damage risk and help you avoid frequent repairs or replacement costs.
- Avoid touching rotors during transport: Try not to press or hold the rotor when you move your bike. Even light contact can bend the thin metal and cause brake rubbing later.
- Use rotor protectors when traveling: A rotor protector covers the disc and keeps it safe from impact during travel. It is very helpful when you carry your bike in a car or truck.
- Don’t clamp rotors directly: Never place a clamp or holder on the rotor while securing your bike. Pressure on the rotor can change its shape and affect brake performance.
- Store bike upright when possible: Keep your bike in an upright position instead of laying it on the ground. It can reduce pressure on the rotor and help maintain proper alignment.
- Check rotor alignment regularly: Spin the wheel and watch the rotor pass through the brake pads. Early checks can help you fix small bends before they turn into bigger problems.
Also, check out why your bike chain might skip under load. It will help you avoid sudden issues in long rides.
Final Thought
Fixing a bent rotor is simple when you follow the right steps with patience. Use light pressure and take time to check the rotor after each small correction for better results.
Always keep safety in mind during this process. You should replace the rotor if the thickness reaches 1.6 mm or damage looks severe, since riding with a weak rotor can reduce braking control. Happy cycling.