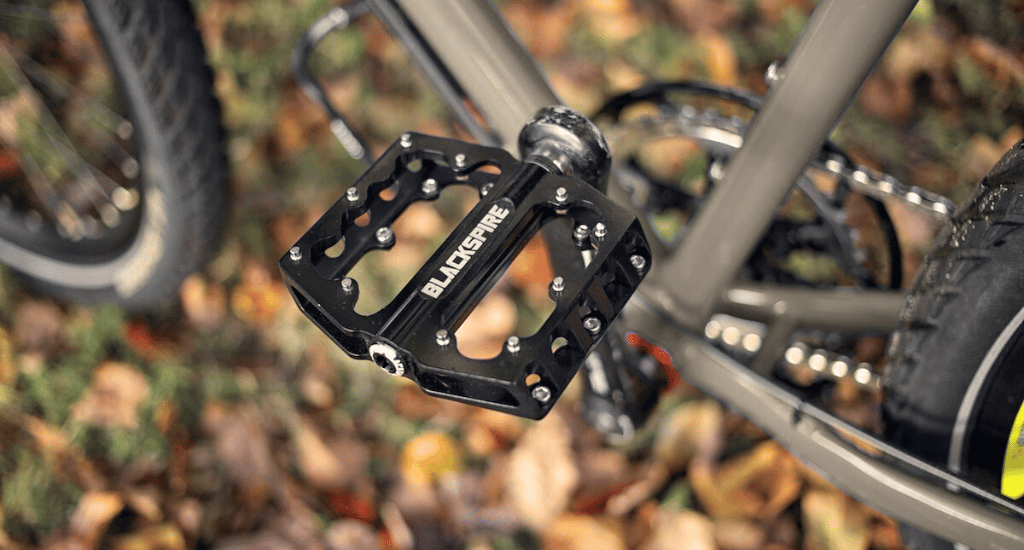
To fix a loose bicycle pedal, first identify which side you’re working on (right pedal tightens clockwise, left pedal tightens counterclockwise). Remove the pedal, clean the threads, apply grease, then hand-thread before tightening firmly with a pedal wrench to 35–40 Nm.
But before grabbing your tools, confirm what’s actually loose. A wobbly pedal and a wobbly crank arm require completely different fixes. The pedal threads into the crank arm, which connects to the bottom bracket at the frame. If the entire arm moves, you have a crank bolt problem, not a pedal problem.
This guide covers how to tighten bike pedals correctly, diagnose stripped threads, fix wobbly bearings, and prevent future loosening.
Is It a Loose Pedal or a Loose Crank Arm?
Before grabbing any tools, identify exactly what’s moving. Hold the crank arm firmly with one hand and wiggle just the pedal with the other. This 5-second test prevents misdiagnosis and wasted effort.
If the pedal moves but the crank stays solid, you have a loose pedal axle. If the entire crank arm shifts at the bottom bracket, you have a loose crank bolt. The fixes are completely different, and tightening the wrong component won’t solve the problem.
| What moves | Problem | Solution |
|---|---|---|
| Pedal only | Loose pedal axle | Tighten the pedal into the crank |
| Entire crank arm | Loose crank bolt | Tighten crank bolt (8mm Allen or 14mm socket) |
| Pedal wiggles on its own shaft | Worn pedal bearings | Tighten the internal locknut or replace the pedal |
How to Tighten a Loose Bike Pedal (Step-by-Step)
Follow these five steps to properly tighten your pedals and prevent future loosening.
Step 1: Identify Left vs Right Pedal
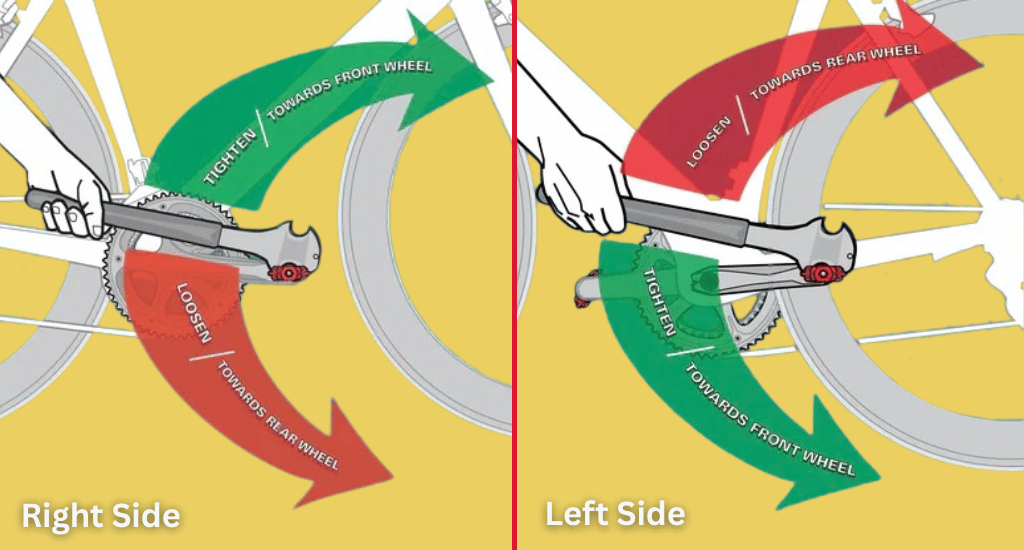
Most pedals are stamped “L” or “R” on the spindle. If not marked, the thread will appear to slope up toward its tightening direction. Left-hand threads slope up to the left, while right-hand threads slope up to the right. The right pedal goes on the drive side (chain side), the left pedal on the non-drive side.
Step 2: Know the Thread Direction
Right pedal: standard thread, tighten clockwise. Left pedal: reverse thread, tighten counterclockwise. Here’s an easy way to remember which way to thread your pedals: To install, spin the top of the pedal spindle toward the front of the bike. To remove, spin the top of the pedal spindle toward the rear of the bike.
Step 3: Remove, Clean, and Grease
Unscrew the pedal completely by turning the wrench toward the rear of the bike (works for both sides). Clean threads on the pedal and inside the crank arm with a rag. Apply a thin layer of bicycle grease to the pedal threads to prevent seizing and corrosion, similar to adjusting a bike’s derailleur correctly.
Step 4: Reinstall Correctly
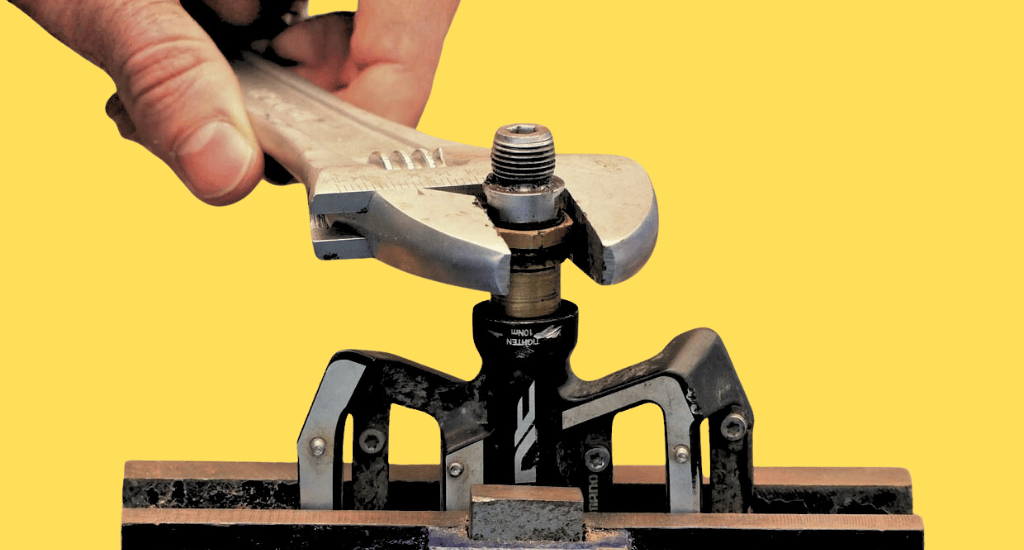
Start by threading the pedal a few turns by hand. This ensures proper alignment and avoids cross-threading. It should only become stiff when it is threaded most of the way on. Once hand-tight, use your wrench to tighten firmly. Shimano recommends torquing the pedals to 35–55 Nm after greasing the threads.
Step 5: Test
Wiggle the pedal firmly. It should feel completely solid with no clicking or movement. Recheck after your first ride.
Pro tip: Shift the chain to the largest chainring. This helps protect against cuts from chainring teeth if your wrench slips.
Tools You Need to Tighten Bike Pedals
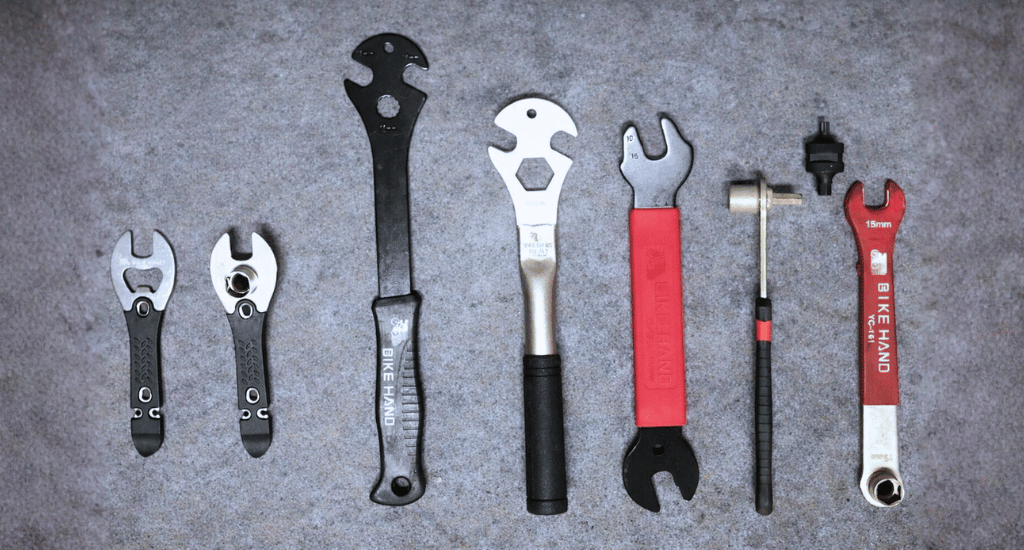
Most pedal repairs require just a few basic tools. Gather these before starting:
- Pedal wrench (15mm) – thin profile fits the narrow pedal flats, long handle provides leverage.
- Allen key (6mm or 8mm) – alternative if your pedal has a hex socket on the spindle.
- Bicycle grease or anti-seize – protects threads from seizing and corrosion.
- Clean rag – for wiping threads before reinstallation.
- Torque wrench (optional) – for precise tightening to 35-40 Nm.
Check your pedal spindle for a hex socket on the inside end, near the crank arm. If present, you can use an Allen key from the back instead of a pedal wrench from the front.
Which Direction Do You Loosen Bike Pedals?
Both pedals loosen when the wrench is turned toward the rear of the bike. Right pedal: loosen counterclockwise. Left pedal: loosen clockwise (opposite of normal). Memory trick: “Back off,” turn toward the back to remove.
Why opposite threads? When the pedal axle is threaded into the crank arm, and the rider pushes the pedal around to move, this causes the axle to “spin” the opposite way in the crank arm. This effect, called mechanical precession, would gradually unscrew a standard-threaded left pedal during normal riding. Along the way, someone realized that by reversing the threading on the left side, those pedals would stay put. The reverse thread harnesses precision to self-tighten both pedals as you ride.
Why Does My Pedal Keep Coming Loose?
Pedals are engineered to stay tight. Due to a phenomenon called mechanical precession, pedals actually tighten themselves while you ride. Both pedals self-tighten as you ride, so a loosening pedal signals an installation problem or thread damage.
The most common causes are under-tightening during installation, installing without grease on the pedal threads (which causes seizing and sudden loosening), or cross-threading the pedal at an angle. Stripped threads from riding with an already loose pedal and impact damage from rock strikes also contribute to recurring loosening.
If you properly installed a pedal and it still works loose, inspect your crank arm threads for damage. Once the crank arm works loose and wobbles for a while, it will distort the crank arm’s tapered square opening. At some point, it will never be able to tighten up properly.
How to Fix Wobbly Pedal Bearings
Sometimes the pedal axle is tight in the crank, but the pedal body still wobbles on its spindle. This indicates loose or worn internal bearings, not a loose pedal.
To fix loose bearings, pry off the dust cap at the outer end of the pedal using a flat screwdriver. Locate the internal locknut and tighten it with a socket wrench or cone wrench until the play disappears. The pedal should still spin freely when you flick it. If tightening removes the wobble but the pedal feels gritty or rough when spinning, the bearings are worn, and the pedal needs replacement.
The pedal body requires regular lubrication. Servicing pedal bearings annually extends their lifespan and prevents this wobble from developing.
How to Tighten Bicycle Crank (If Crank Arm Is Loose)
If the entire crank arm wobbles at the frame rather than just the pedal, you have a loose crank bolt. This is a different problem requiring a different fix.
Warning: If left uncorrected, a loose crank arm can damage the interface between the crank and spindle, especially in square-taper systems where the arm relies on a friction fit.
To fix a loose crank, locate the bolt in the center of the crank arm. Tighten with an 8mm Allen key or 14mm socket to the manufacturer’s specifications. Park Tool’s website information for square-taper cranks suggests a range of 34 Nm to 50 Nm. Shimano Hollowtech II crank bolt pinch screws require 9.9–14.9 Nm of torque. For 2-bolt cranks like Hollowtech II or SRAM GXP, tighten pinch bolts alternately to distribute pressure evenly.
Once a square taper comes loose, even if you stop riding right away, the damage is probably done. It is likely that the crank tapers are damaged, and the crank will continue to loosen. If your crank keeps loosening after proper tightening, the square hole has rounded out, and the crank arm must be replaced.
What If the Pedal Won’t Stay Tight? (Stripped Threads)
If your pedal keeps loosening despite proper installation, the crank arm threads may be damaged. Remove the pedal and inspect the hole. Healthy threads show distinct, even ridges. Stripped threads appear flattened, shiny, or completely missing.
Failed internal threads will look flattened and have a larger inside diameter.
| Damage Level | Solution | Cost | DIY? |
|---|---|---|---|
| Minor (dirty/light damage) | Pedal tap tool to clean threads | $20–30 | Yes |
| Moderate (threads damaged) | Helicoil or thread insert | $25–50 at the shop | Shop recommended |
| Severe (threads gone) | Replace the crank arm | $30–150 | Yes with tools |
On lower-end bikes, a left-side crank arm can be purchased for a fairly reasonable price. However, right-side cranks or higher-end cranks can be much more expensive. In most cases, a pedal thread can be repaired.
For budget cranks, replacement is often cheaper than a Helicoil repair. For quality cranks, a crank with a correctly installed Helicoil is better and stronger than a new one.
Carbon cranks: This repair is not recommended for hollow arms or carbon fiber cranks. Contact your manufacturer for replacement options.
How to Prevent Loose Bike Pedals
A few simple habits keep pedals secure for thousands of miles:
- Always grease threads before installing – prevents seizing and makes future removal easy.
- Hand-thread first – start pedals by hand for 3-4 rotations to avoid cross-threading.
- Check tightness after the first ride – new pedals can settle slightly.
- Monthly wiggle test – grab the pedal and check for play (takes 5 seconds).
- Don’t over-tighten – causes difficult removal and potential thread damage.
- Use pedal washers on aluminum cranks – prevents crank face marring from pedal rotation.
A pedal wrench provides better leverage than a short Allen key, making it easier to reach the correct torque. For most installations, use the 15 mm pedal flats with a pedal spanner. For e-bikes, higher motor torque places extra stress on the pedal interface. Check pedals more frequently and ensure proper torque at installation.
Conclusion
Most loose pedals need nothing more than proper tightening with the correct thread direction and grease on the threads. The key first step is to diagnose whether the pedal or the crank arm is moving. Stripped threads require professional repair or crank replacement, but regular maintenance prevents most problems entirely.
Grease your threads, check your pedals monthly, and you’ll avoid mid-ride surprises. For more repair guides and cycling tips, explore the rest of BicycleXpert.