Bike chain slipping is usually caused by a worn chain, worn cassette, stretched cables, or a dirty drivetrain. These four issues account for most slipping problems. Other causes include a bent derailleur hanger, stiff links, or incorrect chain length.
Most bike chain slipping fixes take under 15 minutes with basic tools. Often, a single turn of the barrel adjuster solves the problem instantly by restoring proper cable tension.
This guide covers 8 common causes with step-by-step repairs for each. Start with the quick diagnostic checklist below, then follow the fix for your specific issue.
Quick Diagnostic Checklist for Bike Chain Slipping
Use this table to quickly identify why your bike chain is slipping and then fix it. Work through each check in order, starting with the easiest fixes first.
| Step | Check | What to Look For | Quick Fix |
|---|---|---|---|
| 1 | Drivetrain cleanliness | Visible grime, dry chain, grinding noise | Clean with degreaser, apply chain lube |
| 2 | Cable tension | The chain hesitates or skips when shifting | Turn the barrel adjuster counter-clockwise in quarter turns |
| 3 | Chain wear | Use a chain checker or ruler (12 inches = 24 rivets) | Replace at 0.5% (11-12 speed) or 0.75% (9-10 speed) |
| 4 | Cassette teeth | Pointed “shark fin” shapes instead of flat teeth | Replace the cassette; the smallest cogs wear fastest |
| 5 | Stiff links | The chain jumps at one spot when backpedaling | Flex the link side-to-side by hand to loosen |
| 6 | Derailleur hanger | Jockey wheel not directly below cassette cog | Straighten with the alignment tool or replace |
| 7 | Chain length | Slack in small-small; can’t reach big-big | Remove links if too long; replace if too short |
| 8 | Freehub | Slack in small-small; can’t reach big-big | Have freehub pawls or ratchet inspected |
If cleaning and barrel adjuster fixes don’t work, move to component inspection. Most slipping resolves within the first three steps.
8 Common Causes of Bike Chain Slipping (& How to Fix Each)
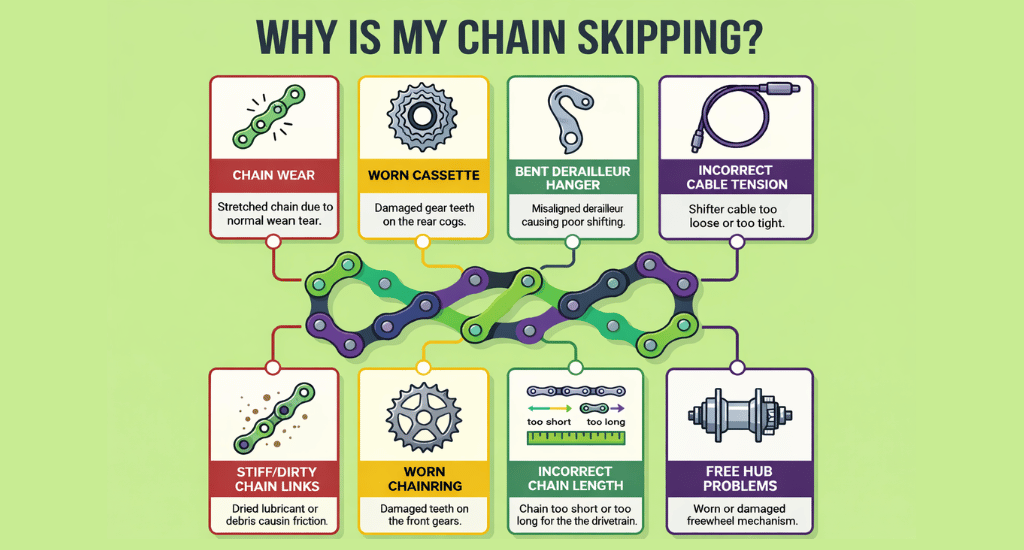
Most chain slipping comes down to worn parts, poor adjustment, or lack of maintenance. Work through these causes in order. The first three account for the majority of cases.
1. Worn or Stretched Chain
A worn chain is the most common cause of a bike chain slipping. Chains don’t actually stretch like rubber. Instead, the pins and rollers inside each link wear down, increasing the distance between links. This is called pitch. When the pitch increases, the chain can’t seat properly in the cassette teeth and slips under pressure.
A typical chain lasts 1,500 to 3,000 miles, depending on riding conditions and maintenance.
How to Check
Use a chain checker tool. Replace 11 and 12-speed chains at 0.5% wear. Replace 5 to 10-speed chains at 0.75% wear. The ruler method also works: 24 rivets should measure exactly 12 inches. More than 1/16 inch over means replacement is due.
How to Fix
Replace the chain ($15 to $50). Replace before 0.75% wear to protect your cassette. Most riders get 2 to 3 chains per cassette when replacing on time.
2. Worn Cassette or Chainring Teeth
Worn cassette teeth are the second most common cause of chain slipping. As teeth wear, they develop pointed “shark fin” shapes instead of flat or rounded profiles. These deformed teeth can’t grip the chain properly, especially under load.
A classic scenario: you install a new chain, and it immediately slips. The new chain’s pitch doesn’t match the worn cassette’s elongated tooth spacing.
How to Check
Look at the teeth. Pointed or hooked teeth indicate wear. If your chain slips in one gear but shifts fine everywhere else, that specific cog is worn. The smallest cogs (11t to 13t) wear fastest because fewer teeth share the load.
How to Fix
Replace the cassette ($30 to $150). Replace the chain at the same time. If you change your chain every 1,500 miles, expect a cassette to last through 2 to 3 chains, or about 4,500 miles. Neglecting chain replacement shortens cassette life to around 3,000 miles.
3. Stretched or Damaged Shift Cables
Stretched cables prevent the derailleur from positioning the chain precisely over each cog. This causes hesitation when shifting, chain skipping to the wrong gear, and ghost shifting, where gears change on their own.
Cable stretch happens naturally, especially during the first few hundred miles on a new bike.
How to Fix
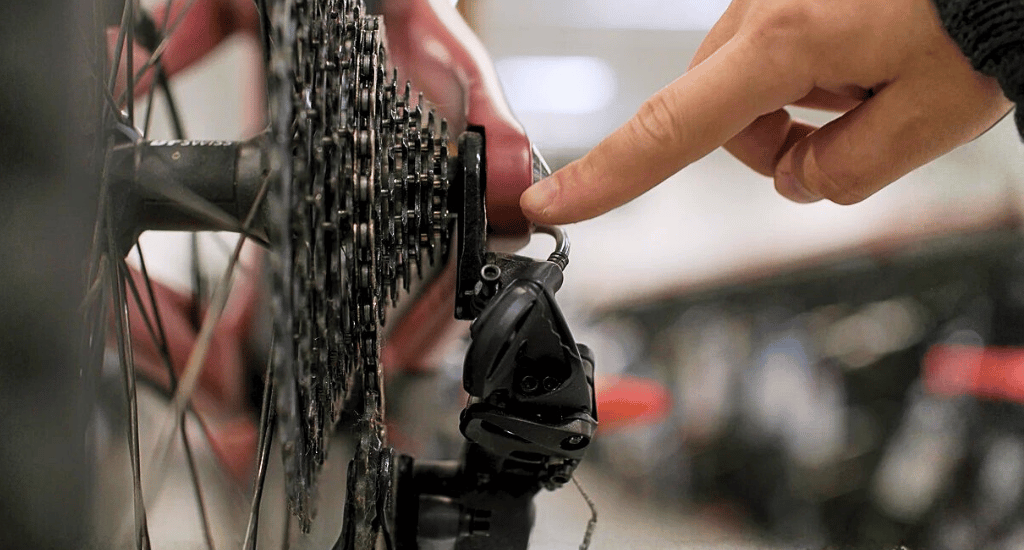
Locate the barrel adjuster where the cable enters the rear derailleur. Turn it counter-clockwise to add tension. Make quarter turns only and test after each adjustment. If the barrel adjuster is maxed out and shifting still suffers, re-tension the cable at the derailleur clamp bolt.
When to Replace
Frayed, kinked, or corroded cables need full replacement, not just adjustment.
4. Dirty or Poorly Lubricated Drivetrain
A dirty or dry chain causes stiff movement, increased friction, and poor tooth engagement. Dirt and grime act as a grinding paste inside your chain, dramatically accelerating wear. A contaminated chain operates at 92% to 97% efficiency compared to a clean one.
Regular cleaning and lubricating make the biggest difference in chain durability.
How to Fix
Clean the chain with a bike-specific degreaser. Let it dry completely. Apply chain lube to the inner plates where the pins sit, not the outer surface. Wipe off any excess, as too much lube attracts dirt.
Frequency
Clean every 100 to 200 miles or immediately after wet or muddy rides.
5. Bent or Misaligned Derailleur
A bent derailleur hanger causes poor shifting across the entire gear range, slipping in multiple gears, and persistent chain noise. The hanger bends easily in crashes, bike drops, or rough transport. A bent hanger pulls the chain sideways, preventing it from seating properly in the cog teeth.
How to Check:
Stand directly behind the bike and sight down the cassette. The derailleur pulley (jockey wheel) should hang directly below the cassette cog you’re in. If the derailleur angles inward or outward, the hanger is bent.
How to Fix:
A derailleur alignment tool can straighten minor bends at home. Severely bent hangers should be replaced ($15 to $40) rather than straightened repeatedly. For precise adjustment, visit a bike shop.
If shifting still feels inconsistent after alignment, you need to review a step-by-step guide on adjusting the bike’s derailleur correctly to fine-tune gear indexing.
6. Bike Chain Slipping When Going Uphill
A chain slipping when going uphill usually indicates a worn chain and cassette combination. Uphill pedaling puts maximum torque on your drivetrain, exposing any weakness that might not show during flat riding.
Cable tension issues can also cause uphill slipping. Check the chain and cassette wear first since these cause most uphill problems.
Special Consideration: Freehub or Ratchet Failure
If the chain stays engaged but your pedals spin freely under hard effort, the problem isn’t the chain. The freehub pawls, or ratchet mechanism inside your rear hub, are worn. Symptoms include slipping only under hard pedaling, not during light spinning.
How to Fix:
Inspect the chain and cassette wear first. If the drivetrain checks out fine, have the freehub inspected at a bike shop.
7. Stiff Link in Chain
A stiff link causes the chain to skip once per revolution at the same spot every time. This often results from improper master link installation or chain damage from a crash..
How to Diagnose:
Backpedal slowly while watching the chain pass over the rear derailleur pulleys. A stiff link will jump as it bends through the jockey wheels
How to Fix:
Grip the chain on either side of the stiff link and flex it side-to-side by hand to loosen. If the link is damaged, remove it with a chain tool and reinstall the master link (quick link) to rejoin the chain.
8. Incorrect Chain Length
A chain that’s too long causes slippage in the smallest cogs because the derailleur can’t take up the slack. A chain that’s too short creates excessive strain and may not reach the big-big gear combination at all.
How to Check:
Shift to the big chainring and the biggest rear cog (big-big). The rear derailleur should have a slight forward bend. If it’s stretched completely straight or maxed out, the chain is too short. Visible slack means it’s too long. To get the correct sizing, use this chain length calculator to ensure proper drivetrain performance and prevent damage.
How to Fix:
Remove links with a chain tool if the chain is too long. If the chain is too short, replacement is the only fix.
Chain Keeps Falling Off? That’s Different
A chain falling off entirely is a different problem from slipping. When the chain comes off, it overshoots the cassette or chainring rather than skipping over teeth while staying in gear.
Common causes include misadjusted limit screws, a bent derailleur, worn chainring teeth, or a chain that’s too long. The limit screws (marked H and L on your derailleur) set physical boundaries that prevent the chain from traveling past the smallest or largest cog.
Quick Fix
Turn the L screw clockwise if the chain falls inward toward the spokes. Turn the H screw clockwise if it falls outward toward the frame. For a chain falling off the front chainring repeatedly, check for worn shift ramps on the chainring teeth.
How to Prevent Bike Chain Slipping
Good chain maintenance stops most slipping before it starts. Follow these preventive steps to keep your drivetrain running smoothly:
- Clean regularly: Every 100–200 miles or after wet and muddy rides.
- Lubricate properly: Apply bike-specific lube to the inner plates, then wipe off any excess.
- Check chain wear monthly; replace at 0.5% to protect the cassette and chainrings.
- Avoid cross-chaining: Stay out of big-big and small-small gear combinations.
- Shift smoothly: Ease off pedal pressure when shifting, especially on climbs.
- Schedule annual tune-ups: Professional derailleur adjustment and cable inspection.
Proper bike setup also matters, and adjusting your cockpit and riding position, such as learning to adjust handlebars properly, can improve control and reduce unnecessary drivetrain strain during climbs.
Conclusion
Most bike chain slipping fixes take under 15 minutes with basic tools. Start with the free solutions: clean your drivetrain and adjust the barrel adjuster. These two steps solve the majority of cases.
If slipping persists, check chain wear with a chain checker tool. A $30 chain replacement protects a $150 cassette from premature damage.
Regular maintenance prevents most problems before they start. Clean and lube every 100 to 200 miles, replace chains before 0.75% wear, and inspect cassette teeth monthly. Your drivetrain will reward you with thousands of slip-free miles. For more repair guides and gear advice, explore BicycleXpert’s other articles.